Since the earliest days of cinema, movie producers have used many ingenious techniques to deliver maximum spectacle for minimal cost – especially when creating fabulous settings that couldn’t possibly be built for real.
One of these techniques is the hanging miniature.
A hanging miniature – also known as a foreground miniature or front miniature – might typically be used to extend a stage set of a busy street. The construction department would begin by erecting just the lower storeys of the buildings. Modelmakers would fabricate the upper storeys at a much smaller scale, then position their architectural miniature close to the camera. As long as everything lined up, the seam between large and small would be invisible, and the illusion would be complete.
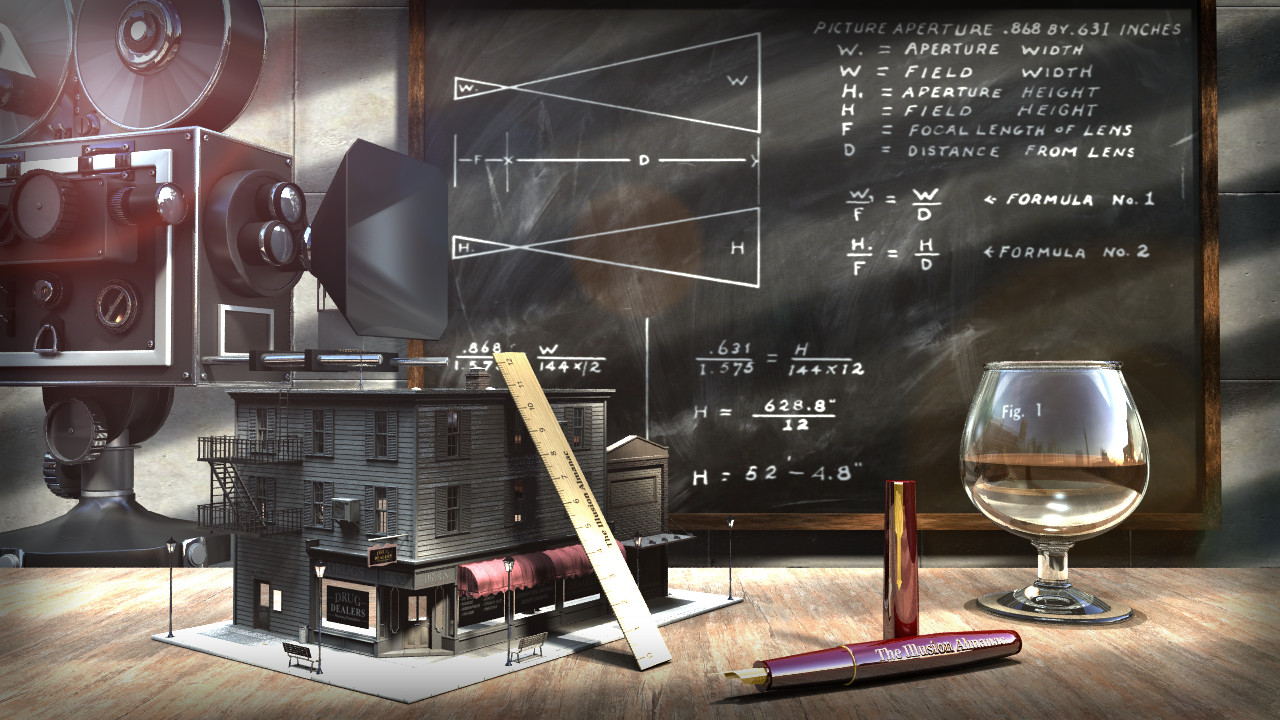
Sounds simple? Not at all. Lining everything up was a tricky business. Fortunately for us, Paul R. Harmer revealed a few old-school secrets in his article “The Mathematics of Motion Picture Miniatures,” published in International Photographer in March 1934, and written in consultation with Paul E. Wylie, former instructor of mathematics for the United States Army.
The first task for any hanging miniature shot is to select the right lens for the job. This depends on the size of the main studio set. Based on the size of an average studio of the day, Harmer presents an example with a full size set measuring around 78 feet wide, and with the camera placed 144 feet from the back wall. By plugging these values into “Formula No.1” (shown in Figure 1, below), he decides that the shot requires a focal length of 1.6 inches – more or less a 40mm lens.

Next question: how high will the full size set reach? This is critical, since it draws the line where the set will end and the miniature will begin.
Harmer suggests 16 feet will give enough headroom for actors and vehicles to move around without straying into the area occupied by the hanging miniature. He also proposes placing the miniature 12 feet away from the camera, for overall practicality and convenience.
Now, to what scale should the miniature be built? The answer is reached by dividing the distance between camera and miniature (12 feet) by the distance from the camera to the miniature’s apparent position at the back of the stage (144 feet). This elementary bit of mathematics tells us the model should be built at one-twelfth scale.
A final round of number-crunching determines the height at which the miniature should be hung. This calculation is shown below in Figure 2. Based on the centre line of the set, Harmer judges that the model should sit precisely 12 feet 4 inches above the stage floor.

All that remains is for the construction department to build the full size set, and the model shop to fabricate its miniature counterpart. When the two are finally married together, the entire team will no doubt be praying that they got their sums right!
“The final test in setting of all miniatures is done by looking through the camera and aligning the adjoining parts, then running a short test through the camera. The print from this film is carefully watched in the projection room for errors in alignment, painting and lighting.”
Paul R. Harmer, International Photographer, March 1934
Similar techniques are employed today, usually with digital architecture taking the place of traditional physical models. They’re called ‘set extensions’ rather than ‘hanging miniatures’ but, hey, what’s in a name?

[…] The Mathematics of Hanging Miniatures […]